|
TECH TIP
MOTOR REPAIR - Freeing Frozen Spindle Shafts
by Mike Dicecco
|
|
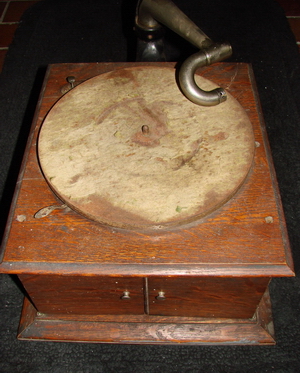
Author’s Victor Victrola IV as it looked when first purchased. The
majority of the machine was there, but the dilemma was in the removal
of the turntable platter.
|
|
|
Ok, so I’ll begin by saying that I’m
sometimes a sucker for “basket case”
gramophones/phonographs. When I see
them in a totally dilapidated state, I think about
how relatively easy they are to bring back to their
former glory. I enjoy the hunt for missing parts,
polishing, restoring and in general bringing the
machines back to life. When a ‘talking machine’
is found in a poor state, there is usually no need
to consider the “refinish vs. keep it original
argument” that often comes up in this hobby.
However, when restoring a machine, it is easy to
end up spending as much as or more than what
it’s worth in the process. This is fine if you’re
keeping it for your own personal use, however it
is something to keep in mind if you’ll be selling
it in the foreseeable future. The best way to keep
costs down is to do the work yourself. Besides,
there’s always the added satisfaction of knowing
that you brought it back to life yourself.
The machine in discussion for this article came
along last year at one of the CAPS auctions; I
ended up purchasing a very sad looking Victrola
IV that, at first glance, appeared to have come
off the Titantic (AFTER it had lain at the bottom
of the ocean for 90 years!). The cabinet was not
too bad (scratches and mild water damage), the
doors were intact, as was the tone-arm and motor
(which had a good spring). Most of the hardware
was covered in rust, but that cleans up easily with
some SOS pads. The felt material covering the
turntable was mostly long gone and replaced with
a solid layer of rust. Missing was only the crank
and the reproducer. For $55 it seemed like a fair
price and had good potential.
I was able to obtain a used crank for $25 from
one of our members, and now I was able to wind
it up. However, the turntable speed was uneven,
so it appeared that I would be in for a mainspring
degreasing and lubrication. This should
always be done anyway for a proper restoration
- I’ve been told that the lubricants used in these
vintage machines often contained animal fats in
the formula. Over the years this grease turns into
a hard lump and it’s necessary to remove and
replace it with modern wheel-bearing grease.
But I had a problem: the machine had obviously
spent a considerable amount of time in a damp
environment and the turntable was now frozen
to the spindle shaft. Rust tightly bonded these
two once separate pieces together. Unless I was
able to remove the spindle from the turntable, I’d
never be able to remove the motor from its board
in order to properly overhaul it. How would I
address this?
For a couple of months I tried putting rust
penetrating oil on the spindle where it meets the
platter. I’ve had some luck in similar situations
before, but not this time. Gentle taps with a
hammer and some prying showed that it would
not free easily, and something more drastic would
be required. I could not merely hammer away at
the top of the spindle. First, this would deform the
visible pointed top of it, and some further damage
could be transposed onto the spindle itself (such
as warping it or damaging the hole or tip that it
rotated in).
One of the many things that I like about going
to CAPS meetings is the chance to sit and talk
with fellow members about various topics that
are phonograph-related. At one such meeting
I discussed my situation with one of our club
experts, Angelo Raffin. He gave me tips on how
best to address this rust-locking problem, which
I’m going to share with you here (as well as some
of my own observations).
|
|
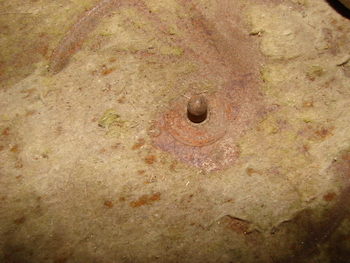
Close-up of the spindle shaft as it was rust-frozen to the turntable platter.
Rust-penetrating oil had no effect on it.
|
|
|
Removing the Spindle
The Victrola IV was originally designed so as to
be able to lift the platter off the spindle in order to
get to the three screws that hold the motor board
in place (in addition to lubricating the spindle
from above). Since this could not be done in the
current rusted state, it would be necessary to
approach the problem from BELOW the motor
board. The IV was Victor’s entry level machine,
and is very simplistic in its design.
Caution: before doing ANY kind of work on
a gramophone motor, you must ensure that the
spring is totally wound down. This will help
protect you from injury as well as any possible
damage to gearing that could be stripped if an
even partially wound spring were to suddenly let
go. You must let the turntable spin until it stops,
then give it a few more rotations to ensure that
there is no residual winding or tension in the
springs.
Once the motor is fully wound down, I proceeded
to remove the governor. This is the little spinning
assembly that usually has three (or two or four)
lead weights on it (refer to photo). The governor’s
job is to control the release of the spring’s energy
in a gradual manner and, in doing so, is also used
to control the turntable speed. You’ll note that the
governor is an intermediary device which contacts
both the main spring-barrel and the spindle. The
governor must be removed so as to fully get to
the spindle gear (it is also impossible to remove
the spindle with the governor present). Usually
the governor is held in place by a small set-screw
on each end. The actual manner in which the
governor is mounted will vary by manufacturer.
Some (such as later Victor motors) will have
small indentations in the “eccentric bearings” for
the governor, so that it is easy to re-set their exact
position. Other brands (especially those made
before 1910) will have quite a possible range of
travel. If this is the case with yours, then I suggest
lightly inscribing or marking the position, so that
the governor can later be returned to the same
approximate setting.
Next, on the bottom of the spindle, you’ll see
that there is usually a set-screw that helps hold
the spindle into position . Remove that set-screw
and slide the pivot assembly out (if so equipped).
Note that some brands have a small ball-bearing
mounted at the base of the spindle (which helps
reduce friction). Be careful not to lose this ball-bearing,
as the motor will not run properly without it.
With the governor fully removed, you should be
able to better see the brass gear that is attached
to the top of the spindle (as viewed from the
underside of the motor). Rotate the spindle until
a small set-screw on the gear is visible. You’ll
probably have to clean off the old grease in order
to get to it better. Remove the set-screw. I ran into
problems in this step. Yes, the set-screw holds
the gear onto the spindle, but years of dried-up
grease also prevented the gear from coming out
as easily as it should. I had to put some degreaser
on the spindle and set-screw to clean the part off
well enough. To remove the old hard grease, I
find that a car engine degreaser works best, along
with an old toothbrush. If engine degreaser is
not available, use something like “Fantastic” or
“409”. Be sure to eventually wash this cleaning
material off with water so that the residue does
not weaken the effectiveness of the new grease
that will later be applied.
|
|
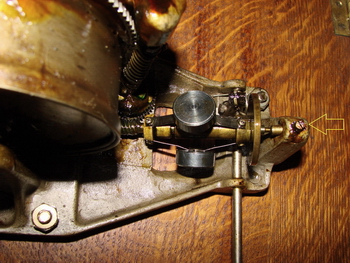
Close-up of the governor assembly. Note how it engages with the brass
gear (on left) that is attached to the underside of the spindle. The
governor also meshes with the spring-barrel to control the release of its
energy. Arrow on right points to the screw that must be removed so as to
free the governor.
|
|
|
Now, I positioned the entire machine right-side
up. To help free up the stuck brass gear, I put both
of my hands underneath the turntable platter and
pulled up. There is usually some looseness or
wiggle room to begin with. Gentle moving up and
down on the turntable gradually forced the brass
gear-ring to the bottom end of the spindle. It took
several rounds of up and down motion, and once
the spindle released the brass gear, I was able to
pull the whole assembly (turntable and spindle)
straight out of the top of the motor board. This
was half the battle over.
Separating the Two Parts
Now that I had the turntable and (rust-frozen)
spindle removed as a unit, I could concentrate on
finally freeing the two parts from one another.
I proceeded to put the spindle/turntable into a
vise on my workbench. The turntable has a bulge
on its underside (likely there to strengthen the
turntable spindle shaft - see photo). This bulge
served as a good way of securing the platter in the
vise (but tighten only enough to hold it in place.
Having it too tight would make it more difficult to
remove the spindle).
Next, I put an old cloth on top of the point (or
top) of the spindle. After a couple of gentle
taps the spindle fell through the bottom of the
platter. Finally, after decades of being rusted
together, these two parts were now free! Mission
accomplished.
With the spindle removed, the rest of the motor
cleaning and greasing should go easy (I hope).
But that is a story for another article.
Epilogue
I am not a phonograph repair technician, nor do
I do this as a business (strictly a hobby, as I’ve
always enjoyed fixing and repairing things). My
purpose in documenting this procedure was to
show our readers how easy it could be for a nontechnical
person to tackle what at first glance
appears to be a very difficult (or near impossible)
repair.
If you are not comfortable in performing this, or
any other service to a gramophone/phonograph
motor, then consult one of the vendors listed in
the advertising section of this magazine.
But sometimes it’s more rewarding (and cheaper)
to do it yourself!
Special thanks to Angelo Ruffin for suggesting the
technique in the first place.
Do you have a technical tip or suggestion you can
share? We’d love to hear from you. Write
myself
or CAPS editor
and we’ll assist in putting your
tip into print.
|

